
This article is part of a series concerning my nixie clock, which was my high school graduation project. The full project is presented here (in Italian). This article concerns a series of experiments and analysis, in order to determine the role of sputtering in the light emission of nixie tubes.
The operating principle hypothesis from which we start are essentially two: the first one is that the light emission is caused by the gas inside the tube, the second one is that the emission is caused by atoms being sputtered from the cathode. On the Internet there are sources that report both versions, and all sources seem to agree on the involvement of sputtering in the nixie, but not on the relevance of this phenomenon in light emission. The user sh37211 in this thread argues that the sputtering contributes to form the light emission, and against the Wikipedia entry on nixie tubes describes sputtering in nixies as an undesirable phenomenon, that causes wear and which is subject to attempt of reduction by the manufacturers.
The hypothesis that considers sputtering as a light emission phenomenon, however less accredited than the other one, could be supported by experimental evidences: during some test operations with a IN-12 tube (slightly different from the IN-14 used for the clock, but made by the same factory in the same period and with similar characteristics) a blue glow in the tube showed, which would not be consistent with the theory of the gas-related emission. Being just one single gas in the tube, the nixie should emit light of a single wavelength uniformly (or a mix of wavelengths, but uniform across the volume).

On the other hand, if the hypothesis of light emission by the gas is consistent, in the light spectrum we would observe the characteristic set of spectral lines of the gasses (which would probabily be a Penning mixture or a neon-mercury mixture). Otherwise we would observe the spectral lines of a metal.
The first operation is to obtain the emission spectrum of a nixie tube. To do this we need a spectroscope, in this case it has been used a prism for photographs, and a diffraction grating (1000 lines/mm) for measuring the wavelengths.

The light produced by a nixie is admitted through an adjustable slit inside the instrument. To reduce the interference of ambient lighting the nixie is wrapped in a black cardboard tube with a front opening, so that only the nixie’s light enters the instrument. The light passes inside the first tube, where a triangular prism divides it into its spectral components, which are projected in a second tube. At the end of the second tube there is an eyepiece and a camera which capture the image of the spectrum. The third tube, shorter, is used to project a measurement graticule inside the instrument (which was obscured in this case).
 Specter of nixie – photos of the
In this spectrum we can notice several yellow and red lines, and fewer lines of green and blue. In order to use this data, it is necessary to measure the wavelength of the various lines. This problem will be addressed later with the use of a diffraction grating spectroscope.
Now we need to determine of which metal the figures are composed. To do this we need to make a sacrifice: we have to take apart a nixie tube. It is always a shame to damage a device no longer in production, but fortunately it is an already damaged nixie, in which the 2 digit is damaged. Once opened we will analyse it with a scanning electron microscope, by EDX analysis to determine the composition. To open it we use a small cutting disc and a dremel.
 The opening of the nixie
The procedure is not particularly difficult, but it takes some time to be completed. I was wearing goggles to prevent glass fragments to get in the eyes. We start doing a groove along the cut perimeter. Doing this, if the tube cracks when cutting deaper, it will crack in the weakest point: the one which we grooved at. While cutting, be careful to not overheat the disc or the glass. As expected a crack is formed along the groove, sparing us from having to manually complete the cut. The nixie is now open.
 The IN-12 open
In the open tube we can notice a small disc inside. It has the appearance of a porous material, but it is not possible to deduce its role. Note that it is also present in the IN-14 tubes, used for the clock. We will analyse this in the microscope too.
 The “porous disc” highlighted in yellow
At this point we remove the clips that hold the digits together, and proceed to disassemble the layers. Among the digits, the most interesting to be observed under the microscope are the zero and the three. The zero presents a darker stain on the left side, and the three presents the same stain on the edge at the top left.

The components of a nixie
Then prepare the sample with the zero, the three, the two (to observe the breaking point), the porous disc and the anode grid. The latter is divided into two, so we can observe both the surface facing the observer and the one facing the other cathodes.

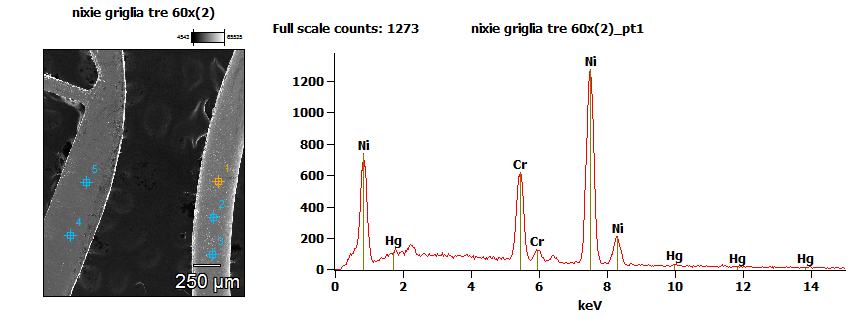
By EDX analysis points the digits’ atomic composition is:
| (wt %) | Si-K | Cr-K | Fe-K | Ni-K | Hg-L |
| point 1 | 0.94% | 17:32% | 1.75% | 78.35% | 1.64% |
There are silicon traces, below 1%, a significant presence of chromium, traces of iron, a large presence of nickel and traces of mercury. I should specify that the data regards only the surface composition, that may be easily contaminated, especially the traces. The composition of this alloy is like the Nichrome, a metal alloy used for electric heaters, composed by 80% nickel and 20% chromium. It could be that kind of alloy with some impurities or a very similar alloy. The presence of mercury makes you think that the gas inside the tubes is neon and mercury vapor, and that hypothesis may explain the blue glow above.

The anode grid is formed by 100% iron. It is interesting to note that different materials are used for grid and figures. It is possible that this is because the different weight of the atoms of the digits make them more resistant (or more inclined) to the sputtering. The anode grid on the other hand can be made of simple iron, cheaper, as it’s not subject to sputtering.
Previously we talked about some black spots on zero and three. At 13000 magnifications these parts’ surface is very uneven.

On the surface there are brighter areas in relief and less bright flat areas. Analysing the characteristic x-ray (EDX) of these two areas it is observed that the brightest parts have a much higher content of mercury (up to 10% of mercury by weight), compared to the flat areas that contain at most 1 %, but often less than 0.5%.
The disc seems made of a very porous material to the naked eye and it is confirmed by high magnification observation.


The disc has proved to be composed almost entirely of titanium, with small traces of chromium, nickel and copper. Knowing the material of which it is composed and the structure at microscopic level, it was possible to trace back its function. It is a getter, a sintered metal material, used in vacuum tubes. We are specifically facing a porous non-evaporating getter. There were traces of a similar device in the patent US3082174A , published prior to the fabrication of the analysed nixie tubes. These devices are used to maintain a constant vacuum within the electronic tubes, because they can adsorb gas molecules on their surface, molecules which can also be released if the internal environmental pressure to the tube decreases. Unlike conventional evaporating getter (causing the peculiar mirrored top on vacuum tubes), these getters remain solid for the entire duration of their lifespan. This enables them to continue to balance the internal pressure for the entire lifespan of the tube.
In the part two we will see how to compare the data obtained by electron microscopy with the spectrum data obtained by the spectroscope grating.
English translation by: Alessandro Bertucci
![]() This work is licensed under a Creative Commons Attribution-NonCommercial-ShareAlike 4.0 International License.
This work is licensed under a Creative Commons Attribution-NonCommercial-ShareAlike 4.0 International License.
the mysterius porous disk is sometong called getter. It retains near vaccum long term, and tubes with getter are much easyer to manufacture.